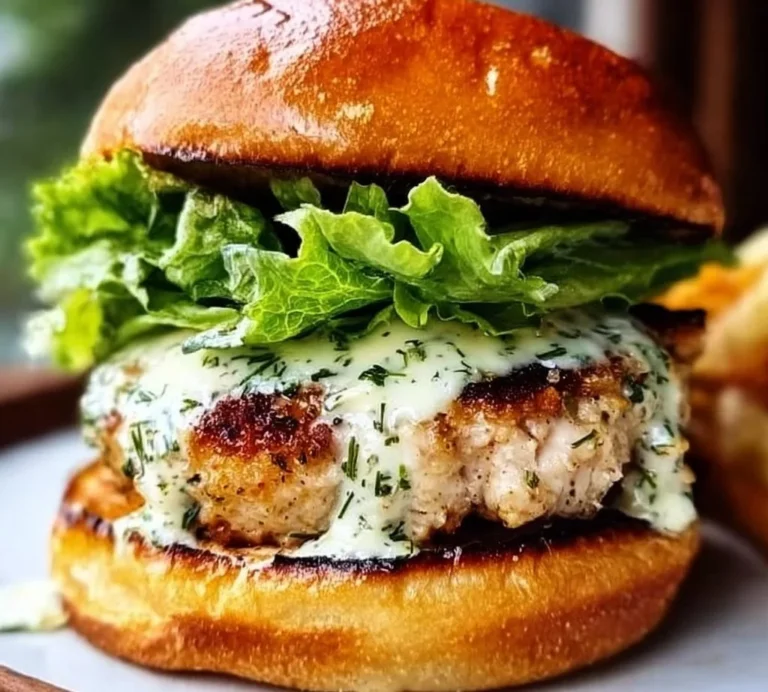
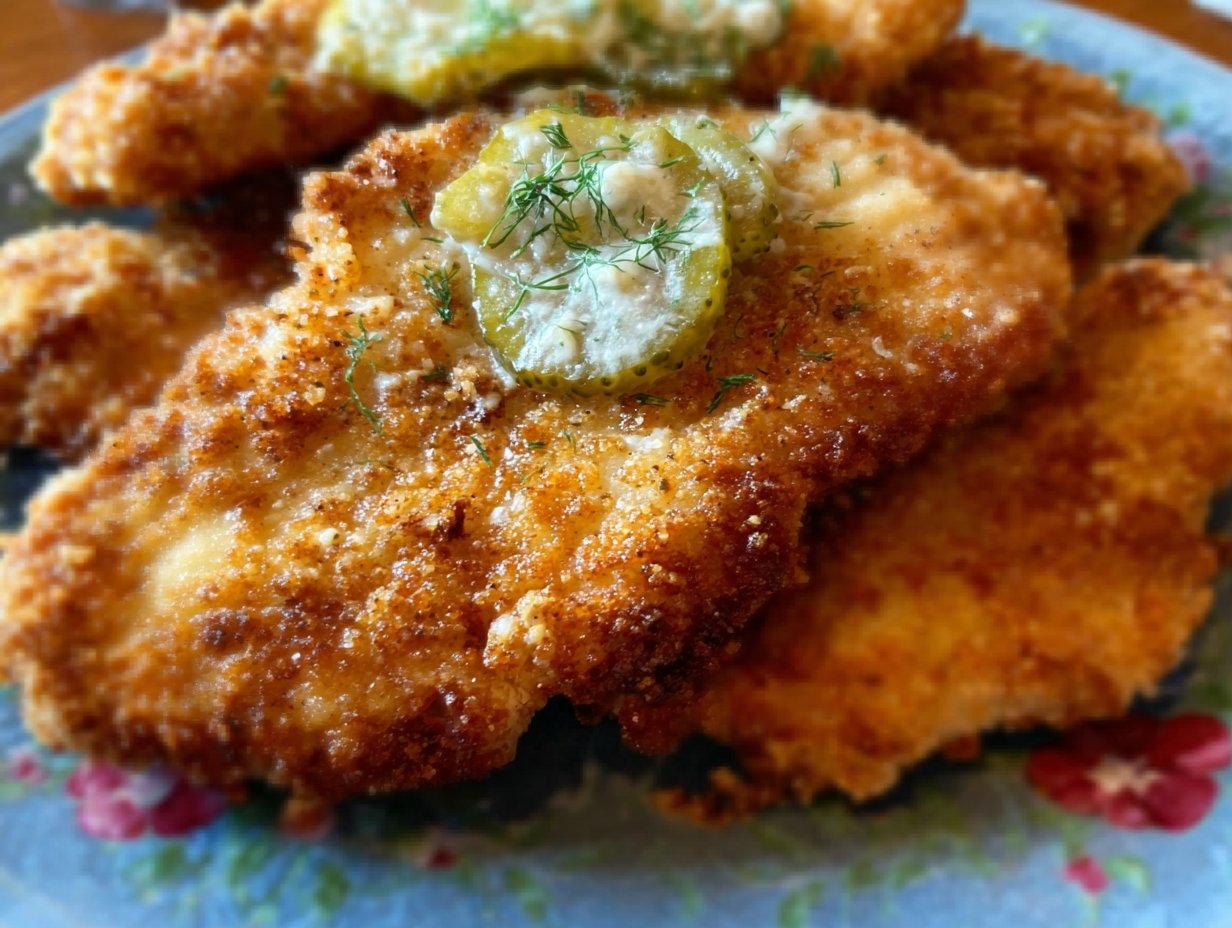
Crispy Dill Pickle Parmesan Chicken

I make this Crispy Dill Pickle Parmesan Chicken whenever I want dinner that’s equal parts comfort and surprise. Thin, tangy pickle-brined chicken gets a Parmesan-speckled breadcrumb crust that fries up golden and crackly — perfect for weeknights, casual gatherings, or a fun twist on sandwich night. The pickle juice adds gentle acidity and juicy texture, while the Parmesan brings savory depth. If you enjoy playful takes on classic fried chicken, you’ll feel right at home here — and you can read a similar take on this flavor combo at this recipe for dill-pickle parmesan chicken.
What makes this recipe special
This recipe balances three textures and flavors: tangy pickle brine, crunchy Parmesan-breadcrumb coating, and tender cooked chicken. It’s quick to assemble, budget-friendly (simple pantry staples), and family-friendly — kids often love the crispiness and mild tang. It’s also flexible: short marinating times still give big flavor, and you can bake instead of fry if you want a lighter version.
“Surprisingly addictive — bright pickle flavor, irresistible crunch, and that umami hit from Parmesan. A new weeknight favorite.” — Home cook review
If you like crisp, cheesy fried chicken, try pairing the dish with a light avocado salad for a creamy counterpoint: https://mixmirth.com/crispy-parmesan-chicken-with-avocado-salad/
The cooking process explained
Quick overview so you know what’s coming:
- Brine chicken in dill pickle juice to flavor and tenderize.
- Set up a three-part breading station: flour (seasoned), beaten eggs, and a breadcrumb + Parmesan mix.
- Dredge each breast through flour → egg → breadcrumb.
- Pan-fry in a shallow layer of oil until golden and the internal temperature reaches 165°F.
- Rest briefly, then serve with sides and your favorite dip.
This linear process keeps the coating crisp and prevents soggy spots. Use a thermometer to verify doneness for safe, juicy chicken.
What you’ll need
- 4 boneless, skinless chicken breasts
- 1 cup dill pickle juice (for marinating) — if you don’t have dill, sweet pickle juice will work but the flavor will be different
- 2 large eggs (for breading)
- ½ cup all-purpose flour (for dredging) — substitute gluten-free 1:1 flour if needed
- 1 cup breadcrumbs (seasoned preferred) — panko gives extra crispness if you prefer
- ½ cup grated Parmesan cheese (mix into breadcrumbs)
- 1 teaspoon garlic powder (for the flour mixture)
- 1 teaspoon onion powder (for the flour mixture)
- ½ teaspoon paprika
- Salt and pepper to taste
- Cooking oil for frying (enough to cover the bottom of the skillet; neutral oil like canola, vegetable, or light olive oil)
Step-by-step instructions
-
Marinate the Chicken
- Place chicken breasts in a shallow dish or zip-top bag. Pour 1 cup dill pickle juice over them so all pieces are covered.
- Marinate in the fridge 30 minutes to 2 hours. (Longer will tenderize more but don’t exceed 4 hours.) Remove and pat dry with paper towels before breading.
-
Breading Station Setup
- In one shallow bowl, combine ½ cup flour, garlic powder, onion powder, paprika, and a pinch of salt and pepper.
- In a second bowl, beat the 2 eggs.
- In a third bowl, mix 1 cup breadcrumbs and ½ cup grated Parmesan. Taste and add a little black pepper if desired.
-
Dredge the Chicken
- Lightly coat each chicken breast in the seasoned flour, shaking off excess.
- Dip into the beaten eggs, allowing excess to drip.
- Press into the breadcrumb-Parmesan mixture, turning to coat evenly. For extra crunch, repeat the egg → breadcrumb step for a double coating.
-
Frying the Chicken
- Heat a large skillet over medium heat. Add oil so it covers the bottom in a shallow layer (about 1/8–1/4 inch). Heat until shimmering, about 325–350°F if using a thermometer.
- Add chicken pieces without crowding the pan. Fry 4–6 minutes per side, adjusting heat so coating browns evenly but doesn’t burn. Cooking time depends on thickness.
- Use an instant-read thermometer — chicken is done at 165°F in the thickest part. Transfer to a wire rack or paper-towel-lined plate to rest 5 minutes.
-
Serving Suggestions (quick finish)
- Slice and serve warm with sauces like ranch, honey mustard, or spicy mayo. Consider stacking on soft buns with pickles for a craveable sandwich.
Best ways to enjoy it
This chicken is wonderfully versatile:
- Serve over crisp salad greens for a lighter meal.
- Pile into burger buns with slaw and pickles for a crunchy sandwich.
- Pair with crispy fries, coleslaw, or roasted vegetables for a classic combo.
- For a hearty dinner, slice and serve over pesto pasta for a bright, herb-forward plate: https://mixmirth.com/pesto-pasta-with-crispy-parmesan-chicken/
Plate on a hot platter so the crust stays crisp. Add lemon wedges if you want a fresh lift.
Storage and reheating tips
- Refrigerator: Store cooled chicken in an airtight container for up to 3–4 days. Keep pieces in a single layer or between parchment to avoid sogginess.
- Freezer: Freeze on a tray until firm, then transfer to a freezer bag for up to 2 months. Thaw overnight in the fridge before reheating.
- Reheating: Best in a 375°F oven for 10–12 minutes on a wire rack so air circulates and crust recrisps. Alternatively, an air fryer at 350°F for 6–8 minutes works well. Avoid microwaving if you want to keep the coating crisp.
Food safety: always cool to room temperature less than 2 hours after cooking and reheat to 165°F before serving.
Pro chef tips
- Pat chicken very dry after marinating — moisture prevents a good crust.
- Don’t overcrowd the skillet; cook in batches so oil temperature stays steady.
- Use a thermometer — thickness varies and visual cues alone aren’t reliable.
- For extra crunch, use half panko and half regular breadcrumbs, and add a tablespoon of melted butter to the breadcrumb mix.
- Keep finished pieces on a wire rack in a warm (200°F) oven while you finish the rest so they stay crisp, not steamed on a plate.
Creative twists
- Oven-baked version: Brush lightly with oil and bake at 425°F on a wire rack for 18–22 minutes, flipping halfway.
- Spice it up: Add cayenne or smoked paprika to the flour or breadcrumb mix.
- Gluten-free: Swap all-purpose flour and breadcrumbs for certified gluten-free versions.
- Sandwich build: Add pickled red onions, shredded lettuce, and a smear of dill aioli for a deli-style sandwich.
- Swap the protein: Use chicken thighs (adjust cook time) or thick-cut tofu for a vegetarian-friendly option.

Common questions
Q: How long should I brine the chicken in pickle juice?
A: 30 minutes gives noticeable flavor; 1–2 hours is ideal for good tenderness and tang. Don’t exceed 4 hours or the texture can become too soft.
Q: Can I bake instead of frying?
A: Yes. Bake on a wire rack at 425°F for about 18–22 minutes, flipping once. Brush with a little oil for a crisper crust.
Q: Is pickle juice safe to marinate raw chicken?
A: Yes — but always marinate in the refrigerator, not on the counter. Discard used pickle juice after marinating; do not reuse it for other foods.
Q: How do I keep the coating from falling off?
A: Pat the chicken dry, press the breadcrumb mixture firmly onto the surface, and avoid flipping too often while frying. Let the crust set for a minute before turning.
Q: What temperature should the oil be for frying?
A: Aim for a skillet temperature of roughly 325–350°F. If the oil is too hot, the crust will burn before the chicken cooks through; too cool and it will absorb oil and get greasy.
Conclusion
If you enjoyed this take on tangy-crispy chicken, you might also like this classic community-tested version from I Am Homesteader: Dill Pickle Parmesan Chicken – I Am Homesteader. For another quick, cheesy weeknight option with a similar flavor profile, see this recipe roundup: Dill Pickle Parmesan Chicken: Crispy, Cheesy & Quick Dinner.
Try the recipe once, then tweak brine time or coating to match your family’s crunch and tang preferences — and enjoy the best of both worlds: tangy pickles and crispy Parmesan.
Crispy Dill Pickle Parmesan Chicken

Ingredients
For the chicken
- 4 pieces boneless, skinless chicken breasts
- 1 cup dill pickle juice For marinating; sweet pickle juice can be substituted.
- 2 large eggs For breading.
For the dredging and coating
- ½ cup all-purpose flour Substitute gluten-free 1:1 flour if needed.
- 1 cup breadcrumbs Seasoned preferred; panko for extra crispness.
- ½ cup grated Parmesan cheese Mix into breadcrumbs.
- 1 teaspoon garlic powder For the flour mixture.
- 1 teaspoon onion powder For the flour mixture.
- ½ teaspoon paprika
- to taste none Salt and pepper
- as needed none Cooking oil For frying; use a neutral oil like canola or vegetable.
Instructions
Marinate the Chicken
- Place chicken breasts in a shallow dish or zip-top bag. Pour dill pickle juice over them and marinate in the fridge for 30 minutes to 2 hours.
- Remove and pat dry with paper towels before breading.
Breading Station Setup
- In one shallow bowl, combine flour, garlic powder, onion powder, paprika, and a pinch of salt and pepper.
- In a second bowl, beat the eggs.
- In a third bowl, mix breadcrumbs and grated Parmesan.
Dredge the Chicken
- Lightly coat each chicken breast in the seasoned flour, shaking off excess.
- Dip into the beaten eggs, allowing excess to drip.
- Press into the breadcrumb-Parmesan mixture to coat evenly.
- For extra crunch, repeat the egg and breadcrumb step for a double coating.
Frying the Chicken
- Heat a large skillet over medium heat and add oil to cover the bottom in a shallow layer.
- Add chicken pieces without crowding the pan. Fry for 4–6 minutes per side or until the internal temperature reaches 165°F.
- Remove chicken from the skillet and let rest for 5 minutes on a wire rack or paper towel.
Serving Suggestions
- Slice and serve warm with sauces like ranch, honey mustard, or spicy mayo.
- Consider stacking on soft buns with pickles for a craveable sandwich.