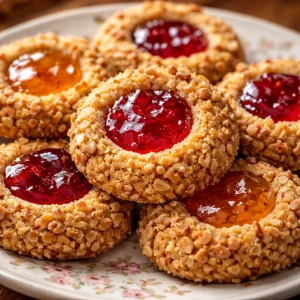
Thumbprint Cookies

I grew up making thumbprint cookies with my grandmother on rainy afternoons — the dough is forgiving, the cookies keep well, and the burst of jam in the center always feels a little celebratory. These are classic, buttery shortbread-like cookies with a jam filling that’s perfect for holiday cookie trays, an afternoon tea, or packing into lunchboxes for a sweet surprise. If you like reliable, small-batch baking that yields elegant results, this recipe delivers every time — and it pairs beautifully with other nostalgic treats like soft gingerbread cookies for a festive spread.
What makes this recipe special
Thumbprint cookies are simple but satisfying: a tender, buttery base and a small well of jam that adds color and concentrated flavor. They’re:
- Kid-friendly to make (rolling and pressing is fun for little hands).
- Budget-friendly — pantry staples form the dough.
- Quick to bake and easy to double for a crowd.
They also hold up well in tins, making them ideal for gifting around the holidays or for cookie swaps. For a little nostalgic inspiration and presentation ideas, many bakers pair thumbprints with other comforting cookies like holiday-style soft gingerbread when assembling cookie boxes.
“A perfect bite of shortbread and jam — crisp edges, tender centers, and bright jam that never overpowers.” — my memory of grandma’s kitchen
Preparing Thumbprint Cookies
Before you start, expect a short, three-stage workflow: make the tender buttery dough, shape and thumbprint the cookies, then bake until the edges barely color. The dough needs minimal chilling (if any) and is easy to roll. Allow the cookies to cool so the jam sets and doesn’t run — that keeps them neat for stacking or gifting.
Gather these items
Key ingredients (yields about 24 cookies):
- 1 cup unsalted butter, softened
- 1 cup granulated sugar
- 1 large egg yolk
- 2 teaspoons vanilla extract
- 2 cups all-purpose flour
- 1/4 teaspoon salt
- Jam or preserves for filling (raspberry, apricot, or strawberry work beautifully)
Notes: Use room-temperature butter for proper creaming. If you want a slightly richer cookie, substitute half the granulated sugar with brown sugar (light). For a gluten-free version, replace the all-purpose flour with a 1:1 gluten-free baking blend, but expect slightly different texture.

Directions to follow
- Preheat the oven to 350°F (175°C) and line a baking sheet with parchment paper.
- In a large bowl, cream the softened butter and granulated sugar until light and smooth, about 2–3 minutes.
- Beat in the egg yolk and vanilla until evenly incorporated.
- Add the flour and salt gradually, mixing just until the dough comes together. Avoid overmixing.
- Roll the dough into 1-inch balls and space them about 2 inches apart on the prepared sheet.
- Press your thumb or the back of a teaspoon into the center of each ball to make a well, without pressing all the way through.
- Spoon a small amount of jam into each indentation — a little goes a long way.
- Bake for 12–15 minutes, until edges are just turning golden.
- Cool on the baking sheet for 5 minutes, then transfer to a rack to cool completely so the jam sets.
I recommend piping the jam with a small zip-top bag (snip a corner) for neater filling and consistent portions.
Best ways to enjoy it
Serve thumbprint cookies on a tiered platter at tea time, boxed with tissue paper for neighbors, or as part of a cookie swap. Pair them with:
- A bright cup of Earl Grey or black tea for a classic pairing.
- Espresso or a milk-based coffee for a slightly richer contrast.
- A selection of jams (apricot, lemon curd, raspberry) so guests can sample different flavor combinations.
For a pretty presentation, dust lightly with powdered sugar after cooling or garnish with a tiny fresh berry on top of the jam.
How to store & freeze
Store cooled cookies in an airtight container at room temperature for up to 5 days. If stacking, place a sheet of parchment between layers to prevent sticking. For longer storage, freeze in a single layer on a baking sheet until firm, then transfer to a freezer-safe container for up to 3 months. Thaw at room temperature before serving.
Safety note: Because jam is high in sugar and low-moisture, it’s generally safe at room temperature in cookies. Still, refrigerate if your jam is homemade and not shelf-stable, or if you live in very hot climates.
Pro chef tips
- Cream butter and sugar thoroughly: this incorporates air and gives lighter cookies.
- Use only the egg yolk — the white would make the dough slightly drier and less tender.
- Keep the indentation shallow so the cookie retains structure while holding jam.
- If your dough is very soft, chill for 15–20 minutes; slightly firm dough rolls and thumbs easier.
- For uniform cookies, weigh dough portions (about 14–16 g each) or use a 1-inch cookie scoop.
- If jam sinks too much in the oven, try chilling the filled cookies for 10 minutes before baking.
For another clever flavor pair, try riffing with brown-sugar-forward cookies like these brown sugar pop tart cookies when you’re experimenting with texture and caramel notes.
Creative twists
- Chocolate thumbprints: add 2–3 tablespoons unsweetened cocoa to the dry ingredients and fill with raspberry jam.
- Nut-studded rims: roll cookie balls in finely chopped toasted pecans before baking.
- Lemon curd centers: swap jam for lemon curd for a tart, bright bite.
- Spiced thumbprints: stir 1/2 teaspoon cinnamon and a pinch of nutmeg into the flour for a warm spice note.
- Vegan swap: replace butter with vegan margarine and the egg yolk with 2 tablespoons of aquafaba reduced slightly (results vary).

Your questions answered
Q: How long does prep and baking take?
A: Active prep is about 15–20 minutes. Baking in batches is 12–15 minutes per tray, so total time depends on oven capacity.
Q: Can I use store-bought or homemade jam?
A: Both work. Thicker jams and preserves hold shape better; very runny jams may spread unless chilled before baking.
Q: Do these need to be refrigerated?
A: No, not typically. Store at room temperature up to 5 days. Refrigerate if using a perishable filling or in hot weather.
Q: Can I freeze the unbaked dough?
A: Yes. Shape, thumbprint, then flash-freeze on a tray. Transfer frozen, unfilled cookies to a bag, then fill and bake from frozen adding a few extra minutes to the bake time.
Conclusion
If you want more variations and photo step-throughs, a helpful tutorial is available at a trusted thumbprint cookie tutorial on Sugar Spun Run, which offers extra shaping tips and flavor ideas. For another tested approach and community reviews, see the detailed recipe and notes at Perfect Thumbprint Cookies Recipe on Allrecipes.
Thumbprint Cookies
Ingredients
Key Ingredients
- 1 cup unsalted butter, softened Use room-temperature butter for proper creaming.
- 1 cup granulated sugar Can substitute half with light brown sugar for richer flavor.
- 1 large egg yolk Do not use the egg white.
- 2 teaspoons vanilla extract
- 2 cups all-purpose flour For gluten-free, use a 1:1 gluten-free baking blend.
- 1/4 teaspoon salt
- Jam or preserves for filling raspberry, apricot, or strawberry A little goes a long way.
Instructions
Preparation
- Preheat the oven to 350°F (175°C) and line a baking sheet with parchment paper.
- In a large bowl, cream the softened butter and granulated sugar until light and smooth, about 2–3 minutes.
- Beat in the egg yolk and vanilla until evenly incorporated.
- Add the flour and salt gradually, mixing just until the dough comes together. Avoid overmixing.
- Roll the dough into 1-inch balls and space them about 2 inches apart on the prepared sheet.
- Press your thumb or the back of a teaspoon into the center of each ball to make a well, without pressing all the way through.
- Spoon a small amount of jam into each indentation.
Baking
- Bake for 12–15 minutes, until edges are just turning golden.
- Cool on the baking sheet for 5 minutes, then transfer to a rack to cool completely so the jam sets.