Easy Biscuit Recipe – No Milk Needed!

I’ve been making this no-milk biscuit recipe for quick weeknight dinners and sleepy weekend brunches — it’s fast, forgiving, and gives you flaky biscuits even when your fridge is low on dairy. With just pantry staples and a splash of water, these biscuits rise up golden and tender, perfect for slathering with butter, jam, or a quick homemade cheese spread like the one I pair with them sometimes. Try them when you need warm bread in under 20 minutes or when guests swing by unexpectedly. For a smooth spread idea, see this simple fresh cheese recipe I like to serve alongside.
Why you’ll love this dish
This recipe is pure convenience without sacrificing texture. Using water instead of milk makes it ideal when your fridge is empty or when you want a diary-free option. It’s budget-friendly, quick (ready in about 20 minutes), and kid-approved — flaky on the outside, soft inside. Because the ingredients are minimal, it’s also a great blank canvas: add cheese, herbs, or spices and you have a different biscuit every time.
“Hands down the easiest biscuit I’ve made — crisp edges, tender interior, and no milk required. Perfect for last-minute breakfasts.” — A regular weekend test-kitchen volunteer
Step-by-step overview
Before you dive in: you’ll whisk dry ingredients, cut in cold butter until the mixture looks like coarse crumbs, stir in just enough water to bring a soft dough together, shape and cut, then bake at high heat for a quick rise and golden tops. Expect to handle the dough gently — minimal kneading keeps biscuits light. This quick flow makes it a reliable go-to when time and ingredients are limited.
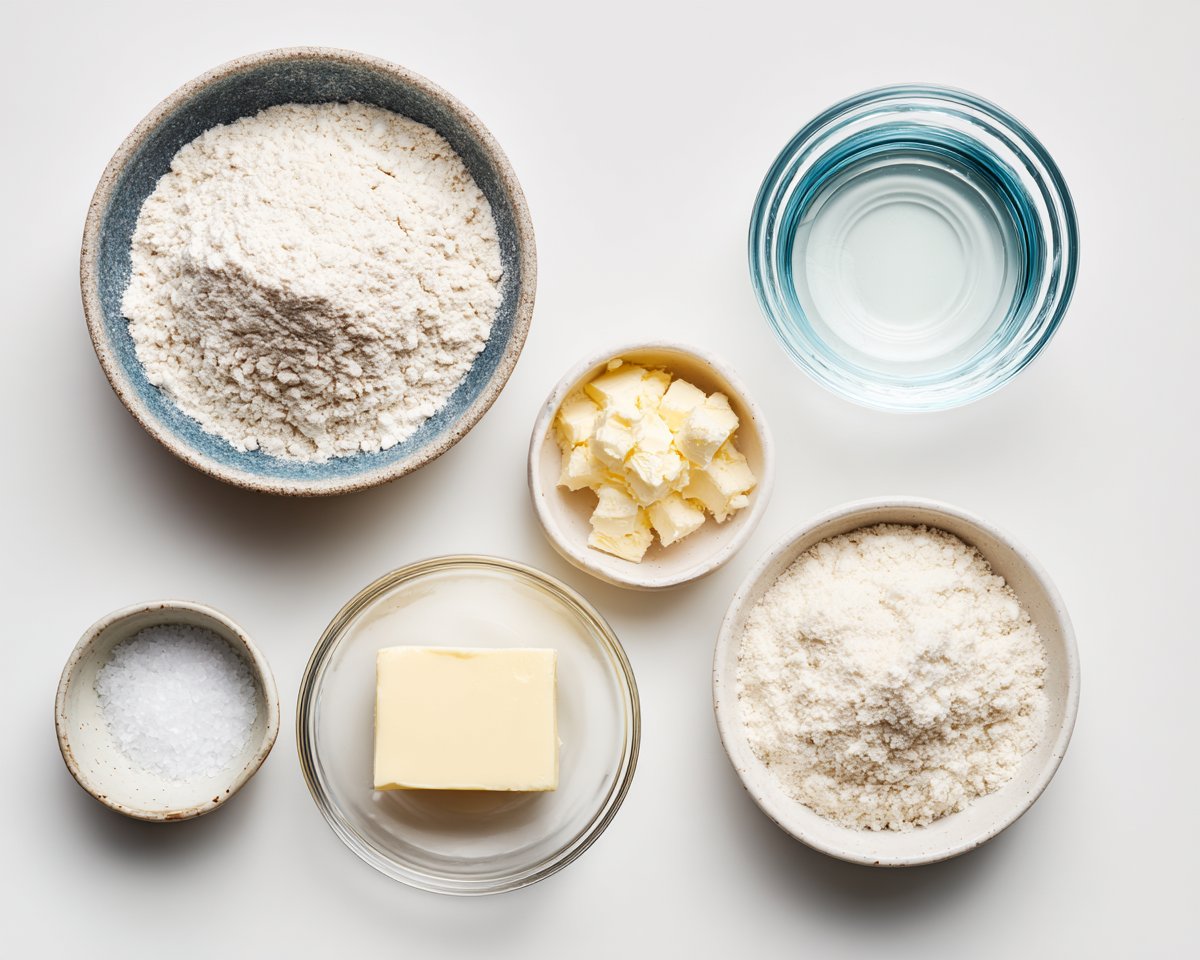
What you’ll need
- 2 cups all-purpose flour
- 1 tablespoon baking powder
- 1/2 teaspoon salt
- 1/4 cup butter, softened (or chilled and cut into small cubes for flakier layers)
- 3/4 cup water (add a tablespoon at a time as needed until dough holds)
Notes and substitutions:
- For a richer flavor, swap the water for unsweetened non-dairy milk (soy, oat) or buttermilk if you have it.
- Use cold butter for flakier biscuits — cut it into small pieces and work quickly.
- For a quicker no-roll method, you can make drop biscuits by spooning rounds onto the baking sheet (see variations).
Step-by-step instructions
- Preheat the oven to 450°F (230°C). Line a baking sheet or use parchment for easy cleanup.
- In a large bowl, whisk together the flour, baking powder, and salt until evenly combined.
- Cut the butter into the dry mix using a pastry cutter, two knives, or your fingertips. Work until the mixture resembles coarse crumbs with pea-sized bits of butter remaining.
- Gradually add the water, stirring with a fork until a soft, slightly sticky dough forms. Add more water a tablespoon at a time only if needed.
- Turn the dough onto a lightly floured surface. Gently fold and press it together 3–4 times — avoid heavy kneading to keep the biscuits tender.
- Roll the dough out to about 1 inch thick. Use a floured biscuit cutter or a glass to cut rounds. Press straight down — don’t twist — to help the biscuits rise evenly. Re-roll scraps once and cut more rounds.
- Place biscuits on the prepared baking sheet, edges touching for taller biscuits or spaced apart for crisper sides. Bake 10–12 minutes until the tops are golden brown. Remove and cool briefly before serving.
Best ways to enjoy it
Serve warm straight from the oven with a dab of butter, honey, or jam. These biscuits are great for:
- Breakfast sandwiches with eggs and cheese.
- A side for stews, chili, or pot roast to soak up sauces.
- Brunch spreads with homemade spreads and fruit preserves — try pairing with these buttery scones for a variety board.
For a finishing touch, brush tops with melted butter and a sprinkle of flaky sea salt or garlic-herb butter for savory use.
Storage and reheating tips
- Room temperature: Store cooled biscuits in an airtight container for up to 2 days.
- Refrigerator: Keep wrapped for up to 5 days. Reheat gently to refresh texture.
- Freezing: Freeze baked biscuits in a freezer bag for up to 3 months. Thaw overnight in the fridge or reheat from frozen. You can also freeze unbaked cut biscuits on a sheet tray and transfer to a bag once solid; bake from frozen adding a few extra minutes.
Reheating: For best texture, reheat in a 350°F (175°C) oven for 8–10 minutes (covered with foil if you don’t want extra browning). Microwave will warm quickly but can soften the crust — 15–25 seconds per biscuit on high works for a quick fix.
Pro chef tips
- Keep the butter cold: small cold pieces of butter create steam pockets in the oven and give flaky layers.
- Don’t overwork the dough: minimal handling keeps the gluten from tightening, so biscuits stay tender.
- Cut straight down: twisting a cutter seals the edges and prevents good lift.
- High oven temp is key: 450°F gives a quick oven spring and a golden crust.
- If you want taller biscuits, place them touching on the sheet so they rise upward instead of spreading.
If you like experimenting, check out this fun ingredient guide for other quick pantry recipes to serve alongside.
Creative twists
- Cheesy herb: stir in 1/2 cup grated cheddar and 1 tablespoon chopped chives.
- Garlic-parmesan: brush with garlic butter after baking and sprinkle grated parmesan.
- Sweet honey biscuits: add 1–2 tablespoons sugar to the dry mix and brush with honey-butter.
- Drop biscuits: skip rolling and drop 2-tablespoon scoops onto the sheet for rustic, quick biscuits (cook times are similar).
- Gluten-free: substitute a 1:1 gluten-free flour blend and add 1/4 teaspoon xanthan gum if the blend lacks it.
- Vegan: use plant-based butter and water or a non-dairy milk. For a richer vegan option, use a tablespoon of olive oil in place of some butter.

Helpful answers
Q: Can I substitute milk for water?
A: Yes — milk or buttermilk will produce richer, more tender biscuits. But the recipe is written for water so it works when milk isn’t available.
Q: How do I get flaky layers?
A: Use cold butter cut into small pieces and handle the dough lightly. Minimal kneading and a high oven temperature help create steam and lift.
Q: Can I make these ahead and bake later?
A: Yes. Freeze unbaked, cut biscuits on a tray until firm, then store in a freezer bag. Bake from frozen, adding a few minutes to the time.
Q: My biscuits spread — how do I prevent that?
A: Use measured flour (too little flour causes spreading), ensure butter is cold, and don’t over-hydrate the dough. Also avoid twisting the cutter when cutting rounds.
Q: Are these safe to keep at room temperature?
A: Baked biscuits stored in an airtight container at room temp are fine for up to 48 hours. For longer storage, refrigerate or freeze.
Conclusion
If you want more inspiration for fast no-milk biscuit ideas or similar quick breads, check out this detailed 5 Ingredient No Milk Biscuit Recipe (Made In 25 Minutes) for another approach that emphasizes speed and minimal steps. For a drop-biscuit version and flavor ideas, this Homemade Drop Biscuit Recipe (No Milk) – Bites with Bri has excellent tips and variations.
No-Milk Biscuits

Ingredients
Dry Ingredients
- 2 cups all-purpose flour
- 1 tablespoon baking powder
- 1/2 teaspoon salt
Wet Ingredients
- 1/4 cup butter, softened or chilled and cut into small cubes for flakier layers
- 3/4 cup water add more as needed until dough holds
Instructions
Preparation
- Preheat the oven to 450°F (230°C). Line a baking sheet or use parchment for easy cleanup.
- In a large bowl, whisk together the flour, baking powder, and salt until evenly combined.
- Cut the butter into the dry mix using a pastry cutter, two knives, or your fingertips until the mixture resembles coarse crumbs.
- Gradually add the water, stirring with a fork until a soft, slightly sticky dough forms.
- Gently fold and press the dough together 3–4 times on a lightly floured surface, avoiding heavy kneading.
Baking
- Roll the dough out to about 1 inch thick and use a floured biscuit cutter to cut rounds.
- Place biscuits on the prepared baking sheet, bake for 10–12 minutes until golden brown.
- Remove and cool briefly before serving.